Showing posts with label biscuit. Show all posts

Tuesday, 7 July 2015

Yum

Whole Wheat Sesame Seed Crackers

Since I have figured that baking is not "Complicated" , I've become a fan of baking. Cookies and crackers are another step towards my baking journey. I nowadays try to make new recipes of cookies and crackers. I choose to make them in little quantity, so that I get another chance of making new flavour of them.

I use to buy sesame seed cracker from shops, as I do LOVE them with my tea. So thought to try baking them myself and with wheat flour. Aim was to get right crunch and flavour. So tried my hands on this recipe and thankful to say that I got almost there.

I still feel it needs a bit of tweaking, which I need to figure out. I'll update the changes, once I'll perfect the taste I want. Kids and family was happy with the way I made them, as they liked the subtle flavour of black pepper and seeds.

Very easy and quick recipe for any teatime gathering. You can top them with different topping of cheese, condiments or dips. Try the recipe in your kitchen and leave your feedback in the comments below..............Until next time, Happy Cooking Friends, Saumya


Ingredients:

Wheat Flour                               - 1 cup
Baking Soda                               - 1/4 tspoon
Baking Powder                          - 1/2 tspoon
Salt                                             - 1 tspoon or to taste
Sesame Seeds                             - 2 tblspoon
Poppy Seeds                               - 1 tspoon
Black Pepper                              - 1 tspoon
Butter                                          - 2 tblspoon
Milk                                            - 4 tblspoon


Method:

In a deep bowl, Sift the flour, baking powder, baking soda and salt into a bowl, then mix in the sesame seeds, poppy seeds and black pepper.

Using your fingertips, rub in the butter until it resembles fine breadcrumbs.
Or in the Stand mixer use the paddle attachment and ad the but, now mix on low speed until it looks like crumbs.

Make a well in the centre, then add cold milk.
Now mix it with your hands to make it a smooth dough. Don’t overmix.

Chill the dough for 15 minutes in the fridge.
Meanwhile Preheat the oven to 180°C. Line 2 baking tray with parchment paper.
Roll the dough into 1-2mm thick circle. Prick it all over and cut the choice of shapes out of it.

Place them on the baking sheets. Repeat until all the dough is used.

Bake the crackers for 20-30 minutes or until lightly golden.
Once starts to turn golden take them out from oven and move on to a wire rack to cool down completely.
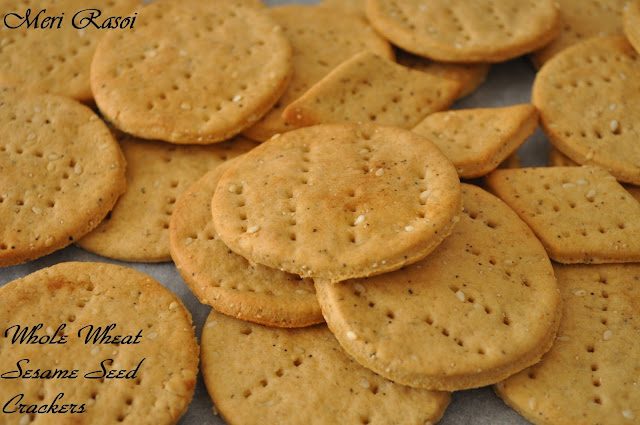
You can serve the crackers with various toppings or plain with your choice of Tea-Coffee.

Tuesday, 23 June 2015

Yum

Nutella Leaf Cookies

Hurry!!!! This is the 200th post of my blog and I'm so excited to share this with you all. You are all who made it possible, encouraging me to cook and post more recipes. I want to thank you all for all the love and encouragement, you have shown for my blog.

Lets celebrate with something simple but everyone's favourite. COOKIES!!!!! Yes, Cookies and that too made with NUTELLA!!!! Ha ha ha , I know I get all excited talking about nutella. This is something I can eat all day long, but at the same time I'm very health conscious. So little bit at a time, that's what made me think of something I can eat within the limit but has pure taste of nutella.

Idea is to make Nutella cookies without so many stuff going in there. No oil, no sugar  and no butter. Crispy and crunchy cookies. So just with 4 ingredients, I made these yumtastic cookies for evening tea. I'm now waiting for my darling daughter to come back from school and we can share our evening tea with these Nutella Leaf cookies.

Does the name sounds good. I love it, but you can shape them as you want and name them accordingly. Easiest recipe and yummiest cookies, is the theme of 200th post, so Thanks once again for all the love and encouragement. Presenting "Nutella Leaf Cookies". Try your hands on them and drop a comment with your feedback........Until Next Time, Happy Cooking Friends, Saumya


Ingredients:

Self Raising Flour                 - 1 cup
Nutella                                   - 1/3 cup
Milk                                       - 1 tblspoon
Nuts                                       - 1 tblspoon (Mixed / Hazelnut) Ground


Method:

Line a baking sheet with baking mat/parchment.
In a stand mixer/Bowl, combine the Nutella & flour until it's like crumbs.
With the mixer running, add the milk and nuts.
Take it out from mixer, and combine it to form dough.
This dough will give you 30 cookies.
I made 16 cookies and freeze rest of the dough.
Divide the dough into equal parts depending on the size.
The simple way to make cookies is to roll it out on a board and cut out the desired shapes from cookie cutter.
I wanted a bit of adventure so I made 16 equal portions of dough.
Shaped and Carved them like leaves.
Place all the cut/shaped cookies on the lined baking tray.

Preheat the oven to 180c. While oven is heating keep the cookie tray in the fridge.
Bake these Nutella cuties in preheated oven for 10-12 minutes, until crisp and just beginning to colour. Remove from the oven and transfer to wire racks to cool. Sorry about the lighting on the picture. It's a dull day.

Cookies are ready to serve with evening tea or as a snack for kids.
You can also sandwich them with Chocolate sauce, Nutella or Vanilla Buttercream.

Sunday, 14 June 2015

Yum

Classic CheckerBoard Cookies

I've always been dreaming of baking, when I first started to cook on my own. I used to be a helper in my mum's kitchen, so honestly i never liked cooking. Once got married and settled into a foreign country, I've had to cook each meal on my own. I never liked outside food much, because that was not made for my taste buds.
Once I started to learn to cook different things, I found myself attracted towards baking. Baking used to be a monstrous job for me one year ago. Now things have changed, I started baking cookies, cakes, muffins and so on and to my surprise, I enjoy doing it. It's much easier than hob cooking sometimes.

So lets come to our to the title of this post, Checkerboard cookies. I've been dreaming of making them since long time. I've gone through many many recipes from other bloggers and most of them were made using eggs, which I don not use in my baking.

One recipe I stumbled up is from Linda of RotiAndRice blog. She explained it quite impressively with all the steps. Assembling the strips were the basic part I was scared of but she explained it very well in writing as well as in video, I made these cookies watching her video this morning, that simple It was. I'm still not perfect on them and need a lot of practice, but they look adorable :)

So here my friends is the recipe, adapted from Linda's blog, with some changes on my choice of size, shape and taste. Try making them and I'm sure you all will love eating them with tea or coffee. Let me know your feedback by dropping the comments below................. Until Next Time, Happy Cooking Friends, Saumya


Ingredients:

Vanilla Dough:

Unsalted Butter                       - 1/2 cup / 1 stick softened
Granulated Sugar                     - 1/3 cup
Plain Flour / APF                     - 1-1/4 cup
Vanilla extract                          - 2 tspoon


Chocolate Dough:

Unsalted Butter                       - 1/2 cup / 1 stick softened
Granulated Sugar                     - 1/3 cup
Plain Flour / APF                     - 1-1/4 cup
Cocoa Powder                          - 2 tblspoon
Orange Extract                         - 1/2 tspoon


Method:

For vanilla dough, cream butter and sugar together in a large bowl until well blended, about 2 minutes.

Now beat in vanilla extract.

Slowly mix in the flour on low speed.

Knead dough with hands to bring it together.
Turn dough onto a clean working surface.
Shape into a rectangle.

Wrap with cling film and chill for about 30 minutes.

For chocolate dough, again cream butter and sugar together in a large bowl until well blended, about 2 minutes.

Beat in the cocoa powder and orange extract.

Slowly mix in the flour on low speed.

Knead dough to bring it together.

Turn dough onto a clean working surface.
Shape into a rectangle.
Wrap with cling film and chill for about 30 minutes.

While the dough are chilling ,  Prepare a sheet of parchment or wax paper to shape the cookies.
Draw a 7inch x 7inch square in the middle of parchment or wax paper.

When both of the dough are chilled, remove from refrigerator.
Place a sheet of the parchment paper with the drawn side of the 7in x 7in square facing down on your
work surface.
Unwrap dough and place in the middle of the 7in x 7 inch square.
Then place a sheet of plastic wrap on the top of dough.

Roll out dough to the outline of the 7in x 7in square.

Use a knife or spatula to push dough into the square so as to minimize wastage.
Do the same for the chocolate flavor dough.

Remove the plastic wrap and cut the dough into three equal width slabs.

Place three slabs of dough, alternating vanilla and chocolate dough one on top of the other.

Gently press the slabs together, so that they stick together.

Cut each slab lengthwise into 3 strips of equal width.

Rearrange the strips of dough to create 2 slabs forming 9 small rectangles crosswise. Simply alternate the colours.

Wrap each slab with plastic and refrigerate for another 30 minutes.

Preheat oven to 350°F (180°C).
Remove dough from refrigerator. Unwrap the dough and slice each log into ¼ inch thick slices crosswise.

Place onto nonstick baking sheet and bake for about 12 minutes. As there were more cookies than my baking tray can occupy, I freeze rest of the dough.

Remove and let cookies cool for 5 minutes before transferring onto a wire rack to cool completely.


These cookies can be stored in an airtight container for up to 2 weeks. I made another batch of 15 and stored the cookies in a jar to treat my kids again with their favourite milk shake. 


Recipe with thanks adapted from Roti n Rice at http://www.rotinrice.com/2014/10/checkerboardcookies/. I did some changes according to my taste and choice of size of the cookies.

Wednesday, 10 June 2015

Yum

Cumin Bites / Jeera Biscuits

Jeera Biscuits/Cumin Bites, as the names say is all about cumin. I love love love the flavour and aroma of Cumin and some other seeds like it for example Carom seeds, fennel seeds and few more. These seeds are very good for your digestion and other health issues. Cumin, normally consumed only in Tadka has a big health profile and I'm gonna give some of the advantages of it here.

Cumin seeds, are an excellent source of iron. Cumin seeds have traditionally been noted to be of benefit to the digestive system, and scientific research is beginning to bear out cumin's age-old reputation. In one study, cumin was shown to protect laboratory animals from developing stomach or liver tumors.

Cumin's unique flavor complexity has made it an integral spice in the cuisines of India and the Middle East. Cumin seeds resemble to caraway seeds, being oblong in shape, longitudinally ridged, and yellow-brown in color. This is not surprising as both cumin and caraway, as well as parsley and dill, belong to the same plant family.

Cumin was mentioned in the Bible not only as a seasoning for soup and bread, but also as a currency used to pay tithes to the priests. In ancient Egypt, cumin was not only used as a culinary spice, it was also an ingredient used to mummify pharaohs.

Whenever possible, buy whole cumin seeds instead of cumin powder since the latter loses its flavor more quickly, and the seeds can be easily ground with a mortar and pestle. To bring out the fullness of their aroma and flavor, lightly roast whole cumin seeds before using them in a recipe. Cumin seeds are not a commonly allergenic food.

During recent grocery shopping in an authentic Indian grocery store, I bought a big pack of Cumin as that was so fragrant and seeds were clean and big. That gave me an idea of making Cumin Biscuits/Bites , which I used to eat back home in Indian. Most of the bakeries in India makes Cumin Biscuits/Bites with different flours and flavours.

As this was my first time to try making them, I tried making biscuits and bites both but in less quantities, Incase I mess-up with everything. I was super excited when everything came together well and tasted great. So here is the recipe of Saumya Ki Rasoi style Cumin Biscuits/Bites. We loved eating them and I'm sure you will love them too.  Let me know by dropping comment to the post, how they turn out for you and family. Until next time.......Happy Cooking Friends, Saumya


Ingredients:

Plain Flour / APF/Maida                - 1 and 1/2 cup
Butter                                             - 1/2 cup unsalted
Sugar                                              - 2 tspoon
Salt                                                 - 1 tspoon
Black Pepper                                  - 1 tspoon crushed
Cumin  Seeds                                 - 2 tspoon                                      
Milk                                                - 1 tblspoon

Method:

Sieve the flour, add the cumin seeds, black pepper, and salt into it. Set aside.
Beat the butter, sugar until light and fluffy.


Add the butter into the flour and start to mix slowly with the fingers, do not knead it like chapati dough.


Use the milk if it's very crumbly and do not come together.


Refrigerate the dough for about 20 mins wrapped in cling film.


Pre-heat the oven at 180 C. Line a baking tray with parchment paper/Baking mat.
Roll out the dough on lightly floured surface. The thickness should be about quarter an inch.


Cut out rounds or whichever shape you prefer out of rolled dough.


Place on the baking tray, then using a fork, pierce a few times on each cookie.


Once all are done, bake until sides starts to turn golden, for about 15 minutes.
Transfer to a wire rack to cool completely, then store in an airtight container.

These little biscuits go very well with tea-time snacks. I can have them anytime and I take them as snack while we are out and about with kids.

**The extensive details about Cumin Seeds are read and adapted from http://www.whfoods.com **